Create A Shortcut For Locking The Computer Screen In Windows
There are many ways in which you can lock the computer screen. The most popular as well as the fastest way to lock it is to use a keyboard shortcut. The keyboard shortcut used to lock the computer screen is Win+L. And the second through using mouse to lock it.
Now I have another method to lock it. You can make a shortcut to lock it quickly. Just follow the simple steps. You can create a shortcut for locking the computer screen in Windows 7, XP and Vista too
Right Cilck on desktop >
New > Shortcut
Now I have another method to lock it. You can make a shortcut to lock it quickly. Just follow the simple steps. You can create a shortcut for locking the computer screen in Windows 7, XP and Vista too
Right Cilck on desktop >
New > Shortcut
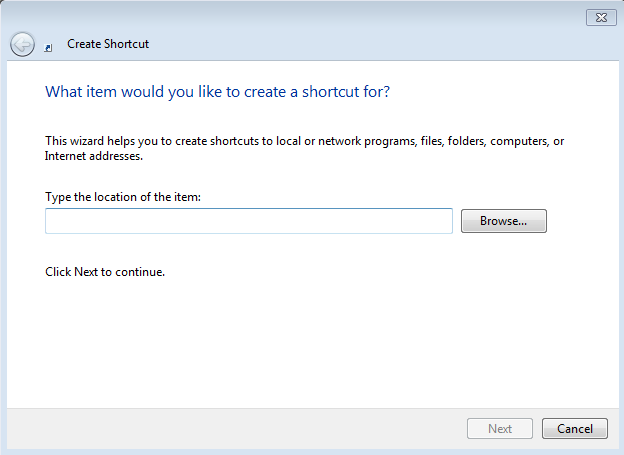
Type rundll32.exe user32.dll, LockWorkStation this text in the shortcut textbox. (This text will work for Windows XP as well even though the screen will be different)
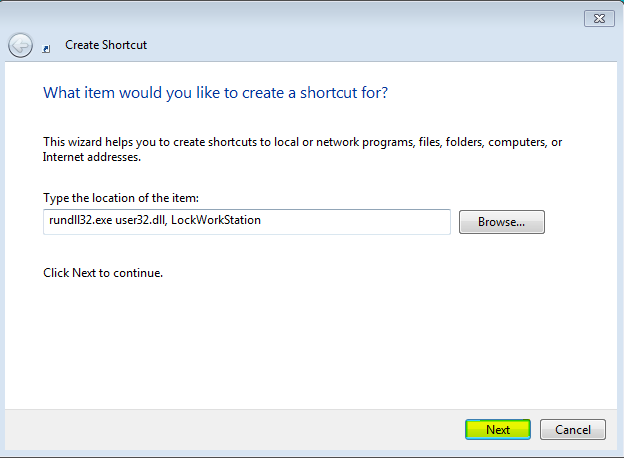
Click on the Next button.
Type the name for your shortcut.

Click on the Finish button.

You have successfully created a shortcut to lock your workstation. Just click on the shortcut whenever you want to lock the computer screen.
Post Flash In Orkut Communities
Post Flash in cmmnty topic
5 steps:-
1.) find a swf file upload it or find 1 uploaded SWF file.
2.)copy the link of the SWF file
3.)suppose link is http://www.kuseman.se/files/funny/swf/binladen_vs_baddudes.swf
4.)replace the link with "Your swf link" in the code below
5.)post the code in any topic
Put your Photo on the Background of your Pendrive without any Software
Here is something, which will turn your boring background of your Pen Drive into a cool one, by putting yours or any other photo.
Just Follow these Steps
Step :1
Copy this code into notepad (copy and paste), then save it as "desktop.ini"
[.ShellClassInfo]
IconFile=%SystemRoot%\system32\SHELL32.dll
IconIndex=127
ConfirmFileOp=0
[{BE098140-A513-11D0-A3A4-00C04FD706EC}]
Attributes=1
IconArea_Image="your_picture.jpg"
IconArea_Text="0xFFFFFF"
VeBRA sources - don't delete the tag above, it's there for XXXXX purposes -
[ExtShellFolderViews]
{BE098140-A513-11D0-A3A4-00C04FD706EC}={BE098140-A513-11D0-A3A4-00C04FD706EC}
{5984FFE0-28D4-11CF-AE66-08002B2E1262}={5984FFE0-28D4-11CF-AE66-08002B2E1262}
[{5984FFE0-28D4-11CF-AE66-08002B2E1262}]
PersistMoniker=Folder.htt
PersistMonikerPreview=%WebDir%\folder.bmp
2. Put "desktop.ini" file onto your flash drive and replace "your_picture" with the
name of the picture you want to use leaving the .jpg extention the same.
3. Now copy the same picture that you want to use onto your flash drive.
4. Close the window and open your pen drive again...and Enjoy your new background
Here is a Screen Shot of my Pen Drive

Use Gmail as Hard Disk
Tired of getting "Disk Space Full" error message ?
Want to get some more disk space for your computer free ?
You can get it, You may have seen Gmail's space is increasing second by second, yes, now use Gmail's space as your Hard Disk.
REMEMBER FOR THIS OBVIOUSLY YOU NEED AN ACTIVE INTERNET CONNECTION
So what you have to do for this is..
Download a small Freeware CLICK HERE TO DOWNLOAD
Extract the files and Double Click Setup to install it.
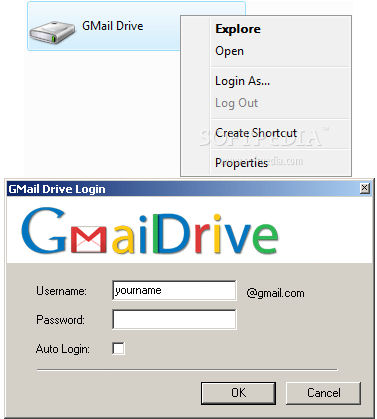
After installation, Go To My Computer, and you will see a new Drive with the name "Gmail Drive"
just open it and a dialog box will appear asking your Username and Password, log in and enjoy your free space.
You cannot create a folder with name con,aux etc., in win xp
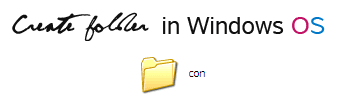 We cannot create few of the folders like CON, AUX etc., directly in win xp and such folders should be created using command prompt and such folders cannot be deleted directly such folders should be deleted using command prompt.
We can actually make folders that cannot be deleted in Windows OS.
It must be made using Command Prompt.
It can only be deleted using Command Prompt.
Steps:
1.Go to cmd.
2.Change to the directory that you want.
3.Assume i change to D:
4.So,in Command Prompt,type D: and [enter].
5.Type in this command "md lpt1\" without quotes and press enter.
6.The folder will now in your D:
7.Go and try and delete or rename it,you cannot do anything to it.
There are still many names that you can use to name the folder:
-lpt1 until lpt9
-CON
-AUX
To delete it:
1.Go to Command Prompt again.
2.Navigate to the directory.
3.Type in rd lpt1\
Hack Passwords Using USB Drive or Pen Drive
There are few ways to Hack Passwords using a USB Drive or Pen Drive.
Here is one of them..
Create an autorun.inf file on the root of your flash drive/Pendrive with the following contents:
[autorun]
open=username.bat
action=Open folder to view files
Now, create a batch file called username.bat with the following contents:
@echo off
echo %username%>>users.dat
date /t>>users.dat
time /t>>users.dat
start "Explorer" %SystemRoot%\explorer.exe
Create username.bat and autorun.inf in the root of your pendrive
Save both file and you are good to go. Now whenever a user plugs your pendrive into their PC,it will display an autoplay option indicating that they have to click on the icon to open the drive to view its contents. A small DOS window will flash for a moment and then disappear.Now If you go into the root of the drive, you will find a new file called users.dat which will record the user names of all the users who have accessed your drive by clicking on the icon. You can open the DAT file using notepad and view its contents.
However..This is not a fool proof method as some geeks disable the autoplay option (or disable writing to USB drives) ,or they just bypass it by pressing RISHT SHIFT key when the pendrive is connected and hence their name will not be recorded or they can delete the users.dat file. But that said,it will work fine nevertheless......
Alternatively, you can also use a Software USB HACK, but that will give you some problems as your Anti-Virus will keep deleting it.
And turning off anti-virus, specially when you are doing this kind of work, is highly not recommended.
Windows Xp Tricks: Convert from FAT32 to NTFS
FAT32 & NTFS, are two popular file systems available in windows
NTFS provides:
- advanced security using access control lists
- Provides file & directory compression for storing more data
- Encryption
- Quotas
- Robustness
NTFS is highly recommended for sensitive data. A clean installed of Windows XP installs NTFS by default. However if you are installing Windows XP over other operating system like Windows 98, you may have installed FAT32 as your file system.
The only benefit of FAT32 is that you can simultaneously use FAT32 formatted disks with older operating systems like Windows 95 Service Pack 2 and Windows 98 in a machine with multiple operating systems.
Personally I would always recommend NTFS over FAT32 any day. More on FAT32 & NTFS here.
So now if you are allured to convert your files to NTFS , is there a way? Yes, there is.
- Open Command Prompt.
- Click Start, point to All Programs,
- Point to Accessories
- Click Command Prompt
- In the command prompt window, type: convert drive_letter: /fs:ntfs
For example, typing convert D: /fs:ntfs would format drive D: from FAT to NTFS.
15 Best Windows 7 Tricks and Hacks
 You have upgraded to Windows 7, love the new taskbar, and enjoy the power of using the cool Libraries feature.
But now you want more. You want the cool tips and tricks that make Windows 7 fun!
So here are the best ones to help you get the most out of your new OS. In this article, we will focus on the Windows 7 interface to get you started on the road to becoming a Windows 7 Power User. In Part 2, we will be looking at advanced tips for usability, performance, and security.
1. Use Keyboard Shortcuts
Using the mouse, you can drag-‘n-dock windows to either side of the screen, or drag it to the top to maximize it. These keyboard shortcuts are even faster:
- Win+Left Arrow and Win+Right Arrow dock the window to the left and right side of the screen
- Win+Up Arrow and Win+Down Arrow maximize and restore/minimize
- Win+M minimizes everything
- Alt+Up, Alt+Left Arrow, Alt+Right Arrow navigate to parent folder, or browse Back and Forward through folders in Explorer
- Win+Home minimizes/restores all open windows except the active window
- Alt+Win+# accesses the Jump List of program number ‘#’ on the taskbar
2.Rearrange System Tray Icons

You can rearrange icons on the taskbar as you wish and start new (or switch to running) instances of the first ten taskbar programs using Win+1, Win+2, and so on. The cool thing is you can also rearrange system tray icons. Reorder them on the tray or move them outside or back in the tray. Take control of what you want to always keep an eye on, and from which apps you’ll require notifications.
3. Access Jump Lists with the Left Mouse Button
Jump Lists usually show up when you right-click on a taskbar icon. However, they can also be accessed by holding the left mouse button and dragging upwards. If you’re using a laptop touchpad or a touch screen, this is convenient because you do not have to click any button to access a context menu.
4. Add Any Folder to Favorites
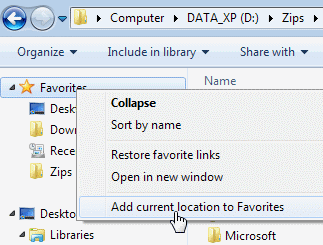
You can add any library or folder to the Favorites section in Windows Explorer. To add a folder, navigate to it in Explorer, right-click Favorites in the left navigation pane, and select Add current location to Favorites. Now you get quick access to your favorite folders in all File->Save As dialogs!
5. Pin Frequently Used Folders to the Taskbar
Right-click, drag, and pin your favorite folders to Windows Explorer on the taskbar. They will now show up in the Jump List when you right click on Explorer giving you quick access to your favorite folders.
6. Pin Control Panel to the Taskbar
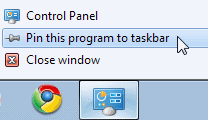
You cannot pin the Control Panel to the taskbar via the Start Menu or by drag and drop. Open the Control Panel and right-click its taskbar icon to pin it to the taskbar. An advantage of this is that Control Panel’s Jump List allows quick access to recently used functions.
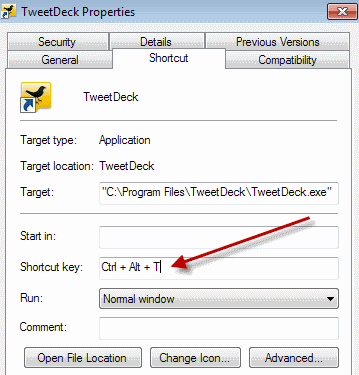
7. Create Keyboard Shortcuts for Programs
You can create keyboard shortcuts for any program in Windows 7. Right-click the program icon and select Properties. Select the Shortcut tab, click in Shortcut key, to set the keyboard shortcut for that program.
8. Open Command Prompt in Any Folder
Like the command prompt? Miss the ‘Open Command Window Here’ Windows XP power toy? Press ‘Shift’ when right-clicking on a folder to get that option in the context menu. This also works on the desktop. No power toy required!
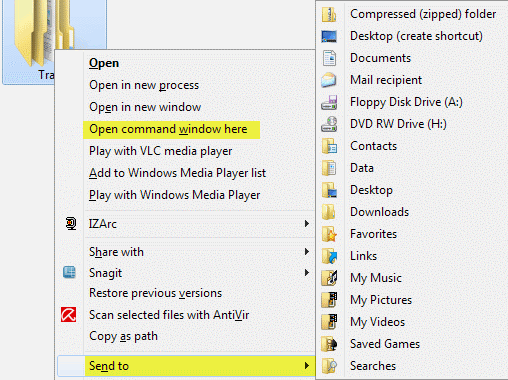
9. View Expanded ‘Send To’ Menu
Press Shift when right-clicking on a folder to get an expanded Send To menu.
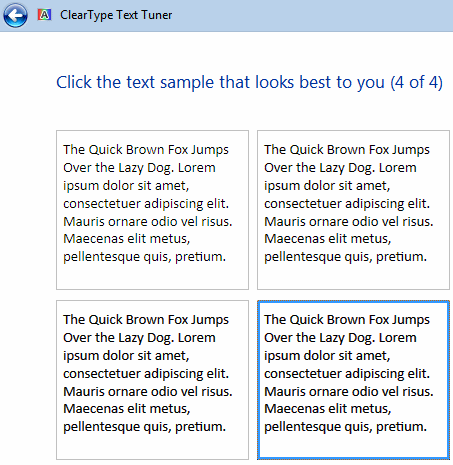
10. Adjust Screen Text with Clear Type
Use Clear Type Tuner for the best look on your LCD monitor or laptop screen. Run ‘cttune.exe’ from the Start Menu search box, or go to the Control Panel Display applet, and select Adjust ClearType Text from the left.
11. Get Exact Colors On Your Screen
If you are an artist or you work with colors, use the Calibrate Color option in the Control Panel Display applet or run dccw.exe from the Start Menu search box. You can adjust gamma, brightness, contrast, and color balance, ensuring that colors are displayed correctly on your screen.
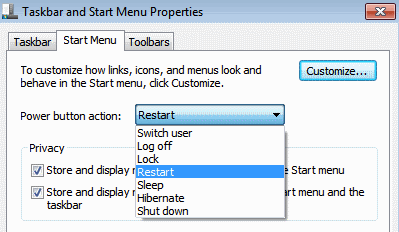
12. Customize the Power Button
If you restart your computer more often than you shut it down, change the default Shutdown power button to Restart. Right-click on Start, select Properties, and choose the Power button action that you use the most.
13. Customize Number of Items in Jump Lists & Start Menu
Right-click Start, select Properties, click Customize and choose the number of recent programs to be shown in the Start Menu and the number of items displayed in Jump Lists from the Start Menu Size section below.
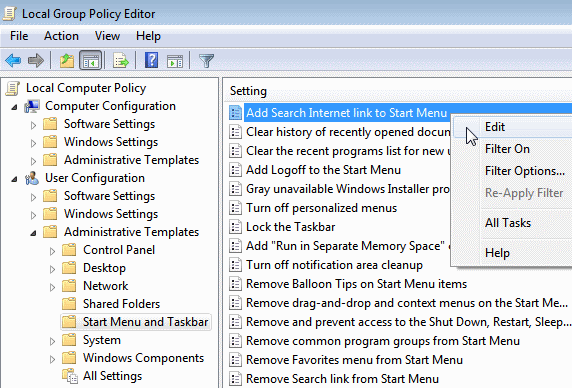
14. Search Internet from the Start Menu
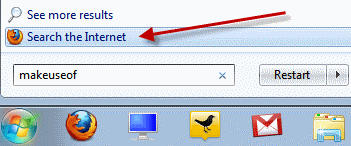
Enable Internet search from the Start Menu using your default browser. Run GPEDIT.MSC from the Start Menu search box to start the Group Policy Editor. In the left pane, go to User Configuration->Administrative Templates->Start Menu and Taskbar. In the right pane, right-click to Edit and Enable Add Search Internet link to Start Menu.
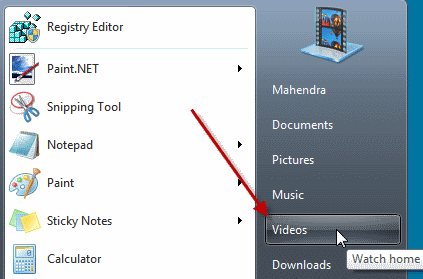
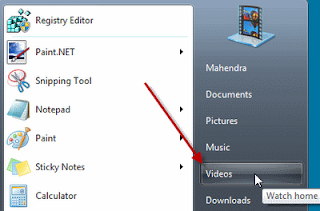
15. Add Videos to Start Menu
Windows 7 does not place a link to your videos on the Start Menu by default. To add a link to your videos on the Start Menu, right-click Start, select Properties, click on Customize. In the Videos section at the bottom, choose Display as a link
Make all Websites think you are from Google !!!
Ever experienced this? You ask Google to look something up; the engine returns with a number of finds, but if you try to open the ones with the most promising content, you are confronted with a registration page instead, and the stuff you were looking for will not be revealed to you unless you agree to a credit card transaction first....
The lesson you should have learned here is: Obviously Google can go where you can't.
Can we solve this problem? Yes, we can. We merely have to convince the site we want to enter, that WE ARE GOOGLE.
The lesson you should have learned here is: Obviously Google can go where you can't.
Can we solve this problem? Yes, we can. We merely have to convince the site we want to enter, that WE ARE GOOGLE.
In fact, many sites that force users to register or even pay in order to search and use their content, leave a backdoor open for the Googlebot, because a prominent presence in Google searches is known to generate sales leads, site hits and exposure.
Examples of such sites are Windows Magazine, .Net Magazine, Nature, and many, many newspapers around the globe.
How then, can you disguise yourself as a Googlebot? Quite simple: by changing your browser's User Agent. Copy the following code segment and paste it into a fresh notepad file. Save it as Useragent.reg and merge it into your registry.
Code:
Windows Registry Editor Version 5.00
[HKEY_LOCAL_MACHINE\SOFTWARE\Microsoft\W
@="Googlebot/2.1"
"Compatible"="+http: // www .googlebot .com/ bot.html
*remove spaces

You may always change it back again.... I know only one site that uses you User Agent to establish your eligibility to use its services, and that's the Windows Update site...
To restore the IE6 User Agent, save the following code to NormalAgent.reg and merge with your registry:
Code:
Windows Registry Editor Version 5.00
[HKEY_LOCAL_MACHINE\SOFTWARE\Microsoft\W
@="Mozilla/4.0 (compatible; MSIE 6.0; Windows NT 5.1)"
Gmail Dot Trick
What is the Gmail DOT Trick ?
> See the following example
Suppose There is a Gmail account : Example@gmail.com
with password : abcd
You will get logged in to example@gmail.com If you use
email as : E.xample@gmail.com
password : abcd
email as : Ex.ample@gmail.com
password : abcd
email as : Exa.mple@gmail.com
password : abcd
email as : Exam.ple@gmail.com
password : abcd
email as : Examp.le@gmail.com
password : abcd
and so on..
That means gmail does not count periods (.)
So you can use this trick for using the same email for various GPT, PTC, Twitter accounts as they interpret all the above emails as different but gmail considers it the same.
Change Your Computer's Processor Name
GO TO START;RUN;TYPE REGEDIT;HKEY_LOCAL_MACHINE;HARDWARE;DISC
SYSTEM;CENTRAL PROCESSOR;
ON RIGHT HAND SIDE RIGHT CLICK ON PROCESSORNAMESTRING
AND THEN WRITE ANYTHING U WANT IN THAT TEXTBOX
So Guys never check your configuration from my computer-> properties cause it can be changed..
for exact configuration of your computer..
go on run;msinfo32;ok
in this dilogue box you will get the exact configuration of your Hardware.
for exact configuration of your computer..
go on run;msinfo32;ok
in this dilogue box you will get the exact configuration of your Hardware.
Free Premium Accounts
ENJOY100% Working Accounts...!!
1.) DIVXCRAWLER
{download movies fastly}
Username : divx273
Password : 8342729
2.)BUTTERFLYDOWNLOADNETWORK {movies, music, Pc Games, Tv shows}
Username : cinemanetwork20
Password : butterfly20
3.)DOWNLOADPROFESSIONAL {movies,Pc softwares, Pc Games, Tv shows}
Username : lo886Ees
Password : zAgt88er
4.)SHARINGZONE{movies, Pc softwares, Pc Games}
Username : LODMQYHX
Password : 375021402
Receipt : 4T5W89RD
5.)UNLIMITEDGAMEDOWNLOADS {movies, Pc Games, psp softwares}
Username : ga20me
Password : ke01feb
6.)WATCHDIRECT.TV {movies, music, Pc Games, online Tv}
Username : cinemanetwork20
Password : butterfly20
7.)FULLRELEASEZ {Greatly Every thing}
Username : Af872HskL
Password : XjsdH28N
8.)FULLDOWNLOADS.US {Greatly Every thing}
Username : Af872HskL
Password : XjsdH28N
9.)PIRATEACCESS {Every thing}
Username : yourfrienddalat@gmail.com
Password : CHh5LKPI
Username : xxx_heel_xxx@yahoo.com
Password : MJY0BUY
Username : i_l0ve_u_786@yahoo.com
Password : rYvLgPrt
Username : mubashar_siddique@yahoo.com
Password : F9Gzgwb5
10.)WAREZQUALITY{Every thing}
Username : ageg2020
Password : z8fsDfg3
ENJOY
Increase Internet Connection Speed in Windows XP
QoS Packet Scheduler is a method of network bandwidth management that can monitor the importance of data packets and depending upon the priority of the packet, give it higher or lower priority or bandwidth levels. It's not very useful unless you're using apps which are QoS-aware or running a server, so you can gain some network overhead back by turning it off.

Note: This following tip will not work on XP Home Edition.
- Make sure you're logged on as actually "Administrator". Do not log on with any account that just has administrator privileges.
- Start & Run & type gpedit.msc (not available in home version).
- Expand the Local Computer Policy branch.
- Expand the Administrative Templates branch.
- Expand the Network branch.
- Highlight the "QoS Packet Scheduler" in left window.
- In right window double click the "limit reservable bandwidth" setting.
- On setting tab check the ENABLED item.
- Where it says "Bandwidth limit %" change it to read 0 (ZERO).
- Close gpedit.msc.
Open Multi Google Talk Logins without any Software
Just follow the simple steps Below:
1) Right click on the Google Talk shortcut.
2) click on Properties.
3) Go to Shortcut tab on Google Talk Properties window.
4) On the Target textbox, add in the /nomutex to the end of the line so that it looks like below (or you can simply copy and paste the below syntax and replace the original).
“c:\program files\google\google talk\googletalk.exe” /nomutex
5) Click on OK.
I didn't have to do anything after this and clicking on the shortcut multiple times just gave me different Google talk window.
Alternative
To create a new shortcut for Google Talk:
1) Right-click on the desktop or anywhere you want to place the GTalk shortcut.
2) Select New on the right click context menu.
3) Then select Shortcut.
4) Copy and paste the following line to the text box when prompted to type the location of the item:
“c:\program files\google\google talk\googletalk.exe” /nomutex
5) Click on Next.
6) Give the shortcut a proper name such as Google Talk or Google
Talk Multiple or Google Talk Polygamy.
7) Click OK until you are done.
Download Youtube Videos with just an OK (5 Second hack)
Download Youtube Videos by using just OK

Although its a pretty old trick, but worth sharing it again..rather than searching for a good downloader.
Almost everybody knows how to download a video from Youtube, but if any of you is still wondering how to do it, then here is a simple 5 seconds trick to download a video.
You just have to type "OK" between WWW. and youtube...
Lets take an example with this link
A NORMAL YOUTUBE LINK
http://www.youtube.com/watch?v=BTCs-cmyHSs
YOUTUBE LINK TO DOWNLOAD THIS VIDEO (With our OK trick)
http://www.okyoutube.com/watch?v=BTCs-cmyHSs
when you put this in your URL bar and hit enter, you will get the download page.
also if you would like to download the video as 3gp format then
it should be like
www.3.okyoutube.com/watch.....
and if you want it as mp4 format then
www.4.okyoutube.com/watch....
How to Hack a Hacker
How to Hack a Hacker ??
Most of you have been thinking that how is it possible, but yes it is..
Here is a simple hack for this..
Introduction
When you're little, you always want to be the best and out last everyone else. When I would play games I always wanted to be #1 and I would turn to hacks to make me #1. Well, I would go on YouTube to help me out with this, but soon found out those hacks were fake and I just lost my account. Now that I'm more educated on the topic and know you can't really hack RuneScape, I just hack the hacker.
I search YouTube and find these "hacks" that say they can get you free membership or promise you items. When I get to the video I see what download link they give. If the link is a spam I wont click it, because they will receive money for it. If the link is a MediaFire, I will download it and hex edit the file. Here is the tutorial on how to hex edit the file:
Hex Editing The "Hack"
You will first need a hex editor like Hex Workshop. When you have installed Hex Workshop correctly you can now hex edit the "hack". Right click on the file to hex edit.
When you hex edit the "hack" press Ctrl + F, select Text String, and type in gmail. If you don't find gmail, just type in FTP:. If you're still not finding it, than the "hack" is a RAT or some other type of virus. In this case, you should just delete the file.
Once you have found the gmail or ftp, you should find the password close by.
Now you can log into their gmail or ftp and screw them up or take their account. I sometimes rub the account in the hacker's face and it's funny to see the reaction. Enjoy!
Take Ownership of Files and Folders in Windows 7 – An Easy Way
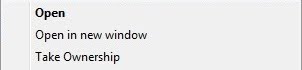
If you are a Windows 7 user, then you are most likely be aware of the fact that you need to TAKE OWNERSHIP of files and folders before you can make any changes to them. This feature was introduced in order to prevent any unauthorized changes from being made to the system files. However it can be little annoying to follow a long list of procedure every time you want to take ownership of a certain file or folder. So to make this job simpler, I have found a nice tool called Take Ownership Shell Extension which adds the “Take Ownership” option to the Windows context menu. This makes taking ownership too simple and requires no more than a click.
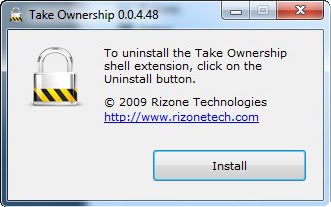
Just run the portable tool kit and click on the “Install” button. This will add the “Take Ownership” option onto the context menu. To take ownership all you need to do is, just right-click on any of the desired file or folder and click the option “Take Ownership“.
In case if you wish to uninstall this tool at any time, you can just run the tool again and click on the ”Uninstall” button. I hope you like this tool. This works on both Windows 7 and Windows Vista. You can download it from the following link.
How to Recover Deleted Files from Windows and Mac

Have you accidentally deleted your files from the Hard disk? Do you desperately want to recover them back? Well you need not panic! It is possible to recover the deleted files back from the hard disk (even after you have Shift+Deleted) provided you act as soon as you realize that the files are deleted and use the best deleted files recovery software. In this post you will find a detailed information on how to recover the deleted files from your Windows PC or Mac.
Today there exists hundreds of data recovery tools and softwares on the market which boast to recover 100% of all the deleted files back in the original condition. But in reality most of these softwares are neither effective nor capable of recovering your files back. So it is very much necessary to make the right choice of the file recovery software in order to recover deleted files back in the original condition. We recommend the following softwares to recover the deleted files
2. Stellar Phoenix Mac Data Recovery (for Mac)
Stellar Phoenix is one of the best company specializing in deleted files recovery services and solutions since 1993. Stellar’s Data Recovery Solutions encompasses a wide range of software for almost any data loss situation ranging from accidental formats to virus attacks to software malfunctions. Hence Stellar provides the best tools to recover deleted files with over 1,000,000 satisfied customers across 137 countries.
How the File Deletion Process Works?
When you delete a file from your computer (or even from the recycle bin) the file is not actually deleted. Unlike what most people think, the file is not permanantly deleted or dropped from your hard disk. Let’s take an example of a book containing 50 pages. Suppose when you delete the page 25, assume that only the entry in the index which points to the page 25 is deleted and not actually the page 25 itself. Likewise when you delete a file from your hard disk, only the pointer which points to this file is removed and not actually the file itself. This file still exists intact and is 100% possible to recover it back in the original condition. In this condition the file becomes invisible and hence appears to have deleted.
What are the Chances of Recovering my Files Back?
Since the operating system doesn’t immediately re-use the space from the deleted files, it is most certainly possible to recover the deleted files back in 100% original condition. It may take up a very long time for those files to be completely deleted since the modern hard disks have ample capacity. Hence the chances are too less that the space from the deleted files are re-used immediately. So, it is really worth to try out the file recovery softwares like Stellar Data Recovery for Windows or Stellar Data Recover for Mac. Some files are reported to have recovered even after years of it’s deletion. However for the best results, it is recommended that you use the file recovery software as immediately as possible to recover your files.
Recovering the Deleted Files
In order to recover the deleted files all you need to do is perform a scan (search) for the deleted files using a File Recovery Software. Please be informed that there is no manual way to recover the deleted files. The Phoenix Data Recovery software performs a thorough scanning of the hard disk sector by sector and will locate the existence of deleted files to restore them back in the original condition. It is the only software that supports 185 popular file types including Windows NT Registry, JPEG, MP4, GIF, BMP and MS Word files. The software offers rich graphical support and incorporates advanced scanning methods to completely scan and recover deleted files from your hard drive. With this you can
- Recover FAT16, FAT32, VFAT, NTFS, and NTFS5 file system partitions
- Recover deleted emails
- Recover deleted documents
- Recover deleted photos
- Recover deleted music
- Formatted Hard-Drive recovery
- Recover files from USB Drives, CDs, DVDs and memory cards
- Recover almost all the camera format files
Display Legal Notice on Startup of your Windows
If your PC has multiple users then you can now display legal notice to every user before they login to your PC. This legal notice will be displayed at every startup just before the Desktop is loaded. Using this you can tell your friends about the do’s and dont’s in your computer when they login in your absence. Well you can do this pretty easily. For this there is one small registry hack. Here is the step-by-step instruction to do this.

1. Go to Start->Run, type regedit and hit ENTER
2. Navigate to the following key in the registry
HKEY_LOCAL_MACHINE\SOFTWARE\Microsoft\Windows\CurrentVersion
\policies\system
On the right side pane look for “legalnoticecaption“, double click on it and enter the desired Legal Notice Caption.
3. Next below this look for “legalnoticetext” and enter the desired Legal Notice Text. The legal notice text can be up to a page in it’s size so that it can include a set of do’s and dont’s for your computer.
4. After you do this just restart your computer and upon the next startup you can see the legal notice information for your computer. This trick works on both XP and Vista. You can also try it on Windows 7 and should work with no problems.
Open MS Office 2007 files in MS Office 2003
Are you unable to open 2007 files in 2003. Because all
programs in office 2003 used the old file extensions for its
different programs. For example Word 2003 saved files with
extension .doc, Excel 2003 with .xls and PowerPoint with .ppt. but
on the other office 2007 used the new file extensions for its
different programs. For example Word 2007 saved files with
extension .docx, Excel 2007 with .xlsx and PowerPoint with .pptx.
Now the problem is that when you will try to open office 2007 files
into office 2003 and you will not open the file due to compatibility
issues between both office versions. Microsoft provides a free
compatibility pack to convert office 2007 documents to the office
2003 format.
Follow the given steps to download free Microsoft compatibility
pack and install it.
To use this feature, you will need to be logged into your
computer
Microsoft compatibility pack. Copy the link and paste it into another tab:
10 Tricks With A USB Thumb Drive

Any ordinary USB memory device can do a lot more than you probably thought it could. It can carry programs, encryption and even a full installation of Windows XP! Here is our tenlist for the coolest things you can do with a USB thumb drive:

Take your programs with you
We all know how frustrating it is when we take your files to another computer just to discover that the software required to read the files is not installed.
Here’s the simplest solution – take your programs with you – on your USB thumb drive. Here’s how to do it with Portable Apps:
1. Go to the Portable Apps website and download the installer, choosing the software you want to carry along.
2. Run the installer and install the software to the root of your USB thumb drive.
And you’re done! As soon as you connect your thumb drive into a computer, Portable Apps will open up automatically.

Surf anonymously
With Portable Apps and Firefox, you can surf the web without leaving any trace on the computer you are using. If you want extra security, install a Firefox security plugin such as FoxyProxy. To iput Firefox onto the drive, just copy-paste the Firefox folder from you computer, or install Firefox onto the thumb drive.

Set a program to run automatically (autorun)
Using autorun, you can set a program to start up automatically when you connect the drive to a computer. You can also use the same script for a data CD-ROM. Note that some computers have autorun disabled for security purposes. [Here's how to disable autorun.]
Open up notepad and paste the following script:
[autorun]
ShellExecute=filename
Label=description
UseAutoPlay=1
Make sure you replace filename with the full path to the file. For example, a file called program.exe in a folder called “programs” on the thumb drive would be /programs/program.exe
Replace description with a short description of the program, for example, My Jukebox or Mozilla Firefox.
Save the file as autorun.inf, making sure you select “All Programs” from the save menu, not “Text document”!

Help! I’m lost!
Ever lost a USB drive? Even if you haven’t, there’s a pretty good chance you’ll lose a few during your life. And with all the important information on it, it could be a disaster to have it fall into someone’s hands.
A good idea is to encrypt all the information on the drive, but you would still want it back, wouldn’t you? Luckily, the folks at the Daily Cup Of Tech have come up with a solution.
Save a program called “Help! I’m Lost!” on the drive, that a finder just can’t get around opening. The program opens a message box with your personal “I’m lost” message. It’s a good idea to offer the finder a bigger reward than the drive itself, so that they’ll be interested in contacting you.

Hide the drive inside something
Why not surprise your friends and co-workers by sticking something that looks like a broken USB cable into the computer’s USB drive?
You’ll be sure to get a few shocked faces when you start to play a movie from it.
The guys from Technobuzz.net show us how to do it. (You are gonna need an unbelievably small thumb drive for this…)

Secure your PC
Just like with an RFID badge, you can use a USB drive to lock and unlock a PC. Insert it to begin working and pull it out when you’ve finished, locking the computer. There are several programs for this . Rohos, a commercial program and WiKID, a semi-open source one.
If you really need to secure your computer with a USB drive, I suggest you give Rohos a try, as WiKID is rather complicated.

Portable jukebox
Don’t just carry the music with you, also carry the player! You can install audio programs such as WinAmp and CoolPlayer+ on your thumb drive. Just unextract the ZIP folders to the USB drive.
If you want the jukebox to start up automatically when you connect the memory stick to the computer, use the autorun feature shown tip 3 and point it to the exe of your audio player.

Encrypt your data
If you carry any sensitive indormation on your USB memory stick, a good idea is to encrypt it. Hardware-level encryption will help, but it will cost extra. You can get a free program to encrypt your data just as securely. For this I recommend TrueCrypt, but most others will also do.
You will need admin access on the computer you want to use your encrypted thumb drive on, so this it’s usability a little.

Run a standalone OS for dedicated tasks
The easiest OS to boot from a USB drive is probably Linux. There are many small capacity Linux versions out there that will fit on your drive. The best 3 are Puppy Linux, Damn Small Linux and Webconverger.
Make sure you select a version that needs less space than your USB drive’s maximum, so you have room for files and software.
And this leads us nicely to the final tip…

Run Windows itself from a USB thumb drive
Modifying Windows to work on a USB drive is quite difficult, but luckily there are some tools that will do it for us. Note that you will need a separate Windows license for this, as Microsoft only lets you use one for each single computer, and a USB drive is treated by them like a computer…
What you’ll need:
1. A licensed copy of Windows
2. A USB device, min. 1GB (We recommend a USB hard disk, as a flash memory stick will become unusable after 100000 writing processes. Assuming that only 2 processes are used per second, the drive will last only 60 days with 8 hours of work
Change Folder Background
It involves making a new desktop.ini system file for that folder, and
changing the attributes for that folder.
changing the attributes for that folder.
First, select the picture you want for that folder. It should be sized
815 x 685, or you will get tiles (of course, if you want tiles, use a
smaller pic).
815 x 685, or you will get tiles (of course, if you want tiles, use a
smaller pic).
You can use your photo editor to crop and/or resize the pic
appropriately.
appropriately.
Note the address of the pic. You will need that.
Create a folder (in Documents) to store the desktop.ini file you will
make, because it will replace the current system.ini of the folder it's
in.
make, because it will replace the current system.ini of the folder it's
in.
Now, open your notepad. Paste the following code into it.
[{BE0981 40-A513-11D0-A3 A4-00C04FD706EC}]
IconArea_Image ="C:\your picture location.jpg"
IconArea_Text= 0x00000000
Make the following changes:
The first line has spaces in it. Remove those spaces.
In the second line, put the address of the pic you will use, in the quotes.
The third line is the color of the folder text. Use light colored text for dark pics, and dark colored text for light pics.
Some color codes you can use. Feel free to use others, if you know them.
Black - 0x00000000
Pink - 0x00FF99FF
Purple - 0x00FF99FF
Red - 0x00FF0000
White - 0x00FFFFFF
· Save the file as: desktop.ini
· Save as file type : All Files
· Save it in the storage folder you made.
Copy the desktop.ini file you just created, into the folder you want to change.
It should replace the one in there.
Go to START and RUN
Type: attrib +s "C:\Location of your folder"
The location of the folder you want to change is in the quotes.
Click OK (or Return)
Open your folder and the picture should be there!
If the desktop.ini files shows in the folder, you can right-click it,
select Properties, and make it hidden.
select Properties, and make it hidden.
Format You Pendrive Using Commands
If you are unable to format your pendrive through GUI mode then
try it through using commands.
try it through using commands.
Start > Run
Type “cmd” or “Command”

Press “ok”

Type here “format x: /fs:fat32” (here X refers to drive like C, D,
E, F, H etc. any of one which Your Pendrive showing currently )
E, F, H etc. any of one which Your Pendrive showing currently )

Press “Enter”

And now it is completed.